Outdoor Kitchen and Swimming Pool Remodel
Murray, Utah
June 2008

This project also makes my favorites list. This was a referral from my cousin who does hardwood flooring. He had done some amazing work inside this home, and because the home owner was so pleased with his work she asked him if he knew anyone who could build a deck around their swimming pool, and add an outdoor kitchen.
I went out to look at the project and found that the home had a really nice swimming pool that was surrounded by 1800 sq ft of concrete patio--the backyard looked like a parking lot. The concrete had settled and cracked over time, and on two separate occasions the homeowners had paid several thousand dollars to have a company sandblast a layer of paint off the concrete, caulk the cracks and put on a fresh coat of paint. The homeowner had hated the concrete since the day they moved in, but years ago someone told them they couldn't remove the concrete without damaging the pool. So, consigned to living with a concrete parking lot in her backyard the homeowner started looking at other alternatives, and had asked me what it would cost to cover the concrete with a decking material.
As per the
home owner's request, I began putting together some numbers on the cost of 1800 sq ft of decking, but I knew that she would not be happy with me if I covered all her concrete with another temporary fix. So, I took the liberty of contacting a concrete removal company that I had done a lot of work with, and had the owner take a look at the project. Though he had all sorts of heavy equipment for removing concrete he realized that this would take some finessing, and all the concrete would have to be removed by hand. Once I knew that the concrete could be removed I began designing an outdoor living area using
pavers, stone, grass and planter boxes,. I chose these
materials because they would be much easier to maintain, and would create a much more appealing living area. When I put together a budget for each scenario, I found out that it was actually cheaper to tear out the concrete, and rebuild the backyard, than it would be to try to build a deck on top of the concrete--a lot cheaper.
When I presented the idea to the homeowner she was elated. She couldn't believe that the concrete could be removed. In fact, the day we removed the concrete she joked about how happy it made her to look out her window and see dirt instead of concrete.
This was a very rewarding project that came together very nicely. Thanks to all our trade partners and the excellent work they do.
Below are some before and after pictures of the project:

Before: View from south end of pool. You can see the concrete pitted and cracked

After: We removed the concrete and replaced it with
pavers, which can be replaced or easily fixed in the case of future
settling.

After: We also added this small, though much needed section of grass, along with a stone border at the edge of the flower beds.

After: We replaced a makeshift drinking fountain that would spill all over the concrete with this one that drains properly, and matches the style of the existing light posts

Before: this is an elevated
children's pool. They wanted to add some privacy in the planter box to the right.

After: We removed the concrete slap, but left the existing steps in tact. We also added a row of
Adirondack bushes along the back fence to provide some much needed privacy.

Before: Along the North end of the pool was this narrow pathway leading to the
children's pool, and an open rail wall providing no privacy.

After: We removed the concrete right up to the edge of the open rail wall, and used the space to plant another row of
Adirondack bushes to provide privacy. And we were still able to leave a 3' wide path to the
children's pool.

Before: The Northwest corner of the pool had this unsightly drain that drew your attention because was so elegantly framed in concrete.

After: We were able to get rid of the concrete and reconfigure the drain cover to allow for a larger planter area. The pyramid-like rock is one of the outdoor speakers connected to the stereo we installed in the pool house.


Before: This broken path of
pavers you see in the top right corner, leads over to another large section of concrete where a hot tub use to sit. And you can see the concrete landing has cracked and been caulked and painted, but has begun to chip again.

After: I loved scattered path of
pavers, and after we pulled up part of the path that led to the hot tub platform, we were able to re-use them in place of the cracked concrete landing that we removed. We also removed the concrete steps and installed sandstone steps for two reasons; One, to add a new element to break up the spaces, and two, to help tie the scattered
pavers together with the
pavers below. We also used this same color of sandstone as the border around the planters tying the whole yard together.

After: This is the other end of the scattered path of
pavers. The grass you see is where the hot tub pad once sat.

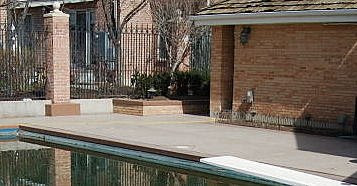
Before: This path leads to the pool house and to the front of the house

After: The
pavers really tie this area together making it more inviting an warmer.
Before: There was a large open patio area on the East side of the pool that provided the perfect location for an outdoor kitchen; we were able to attach the plumbing to the
adjacent pool house wall, making this the perfect location.

After: We designed the Kitchen as an L-shaped peninsula, building it out of brick that matched some of the accents of the house. And we topped it with a granite slab to help protect it from the weather. All of the appliances are stainless steel, making this a very low-maintenance, long-lasting kitchen.


After: The outdoor kitchen area has a 48" grill with warming tray below, an ice-maker and fridge, and over in the far-right corner (unfortunately just out of the picture) is a 18" sink.
 This bathroom is in a home that was built in the early 70's. The bathroom had been very well maintained, but it was one of only two bathrooms in a 4 bedroom home; and it had no shower, only a bath tub. Though all the children are out of the house, when they come to visit they all have to use the shower in the master bath. So when the homeowners contacted me they wanted to turn the tub into a tub/shower combo, and give the entire room an update.


 The cabinetry became the anchor for the entire project, and help us to set a color scheme and style.


 ...details, details, details...
 This room really came together very nicely. The from the cabinets to the granite top, to the matching hardware elements and lighting. The warm-tones and new shower, created a very inviting and functional bathroom that the homeowners were delighted with.


